YES!
the title is correct…
painting with archival inks…
I discovered this technique a few days before CHA, when it was down to the wire hectic & I didn't have time for a blog tutorial…
but today I DO!
sit back…RELAX & I'll show you another unique way to use your archival ink pads…
BUT FIRST…
STOP THE PRESS!
this is my 1000th blog post!
when I started this blog, I wondered if I had enough art in me to share…
I wondered what I would talk about…
I wondered if anyone would even show up to read what I wrote…
1000 posts later…it seems to be working...
so,
as a
thank you
for being
the best
most fantastic
lovely
wonderful
supportive
FUN
blog friends
ever...
I wanted to celebrate my 1000th blog post with a tutorial &
a GIGANTIC GIVEAWAY…
I have some awesome friends
who have contributed some
awesome prizes…
just for you...
the details are at the end of the post...
now…let's get back to the business of making art...
I grabbed these 3 archival colors to start with…
leaf green, forget-me-not and cornflower blue...

the photo below shows the secret ingredient…
tim's detail waterbrush, filled with rubbing alcohol (aka surgical spirits in the UK)…
it's important that you use rubbing alcohol in the waterbrush…
DO NOT use alcohol blending solution…
alcohol blending solution will eat & destroy the waterbrush…
that's NOT a good thing!
rubbing alcohol is safe & will NOT damage the brush at all…
so now I have one brush filled with water to use with distress inks & one brush filled with rubbing alcohol to use with archival inks...
I added a bit of washi tape to my detail waterbrush that is filled with rubbing alcohol…
this will help me know that this brush is the rubbing alcohol filled waterbrush...

because we're using alcohol, specialty stamping paper is the surface of choice…
as a reminder…
when using specialty stamping paper…
DRY between each layer…
the magic coating on the paper slows the drying process for anything used on the paper...
I tested this technique on manila card stock & on tim's watercolor paper…
the technique does not work on those surfaces...
the ink soaks thru...
glossy card stock worked pretty well as long as you don't super saturate the paper & dry it fairly quickly to prevent bubbling…
it will work ok for a card, if you glue it to a card base so that you can cover up the back…
HOWEVER…
I'm not a huge fan of glossy & I LOVE the beautiful matte finish of the specialty stamping paper (SSP)…
so that's the surface I like best…
plus I have never had any color seep thru to the back, when using SSP…it really takes a lot of abuse & is great for multiple layer techniques that use lots of fluids...
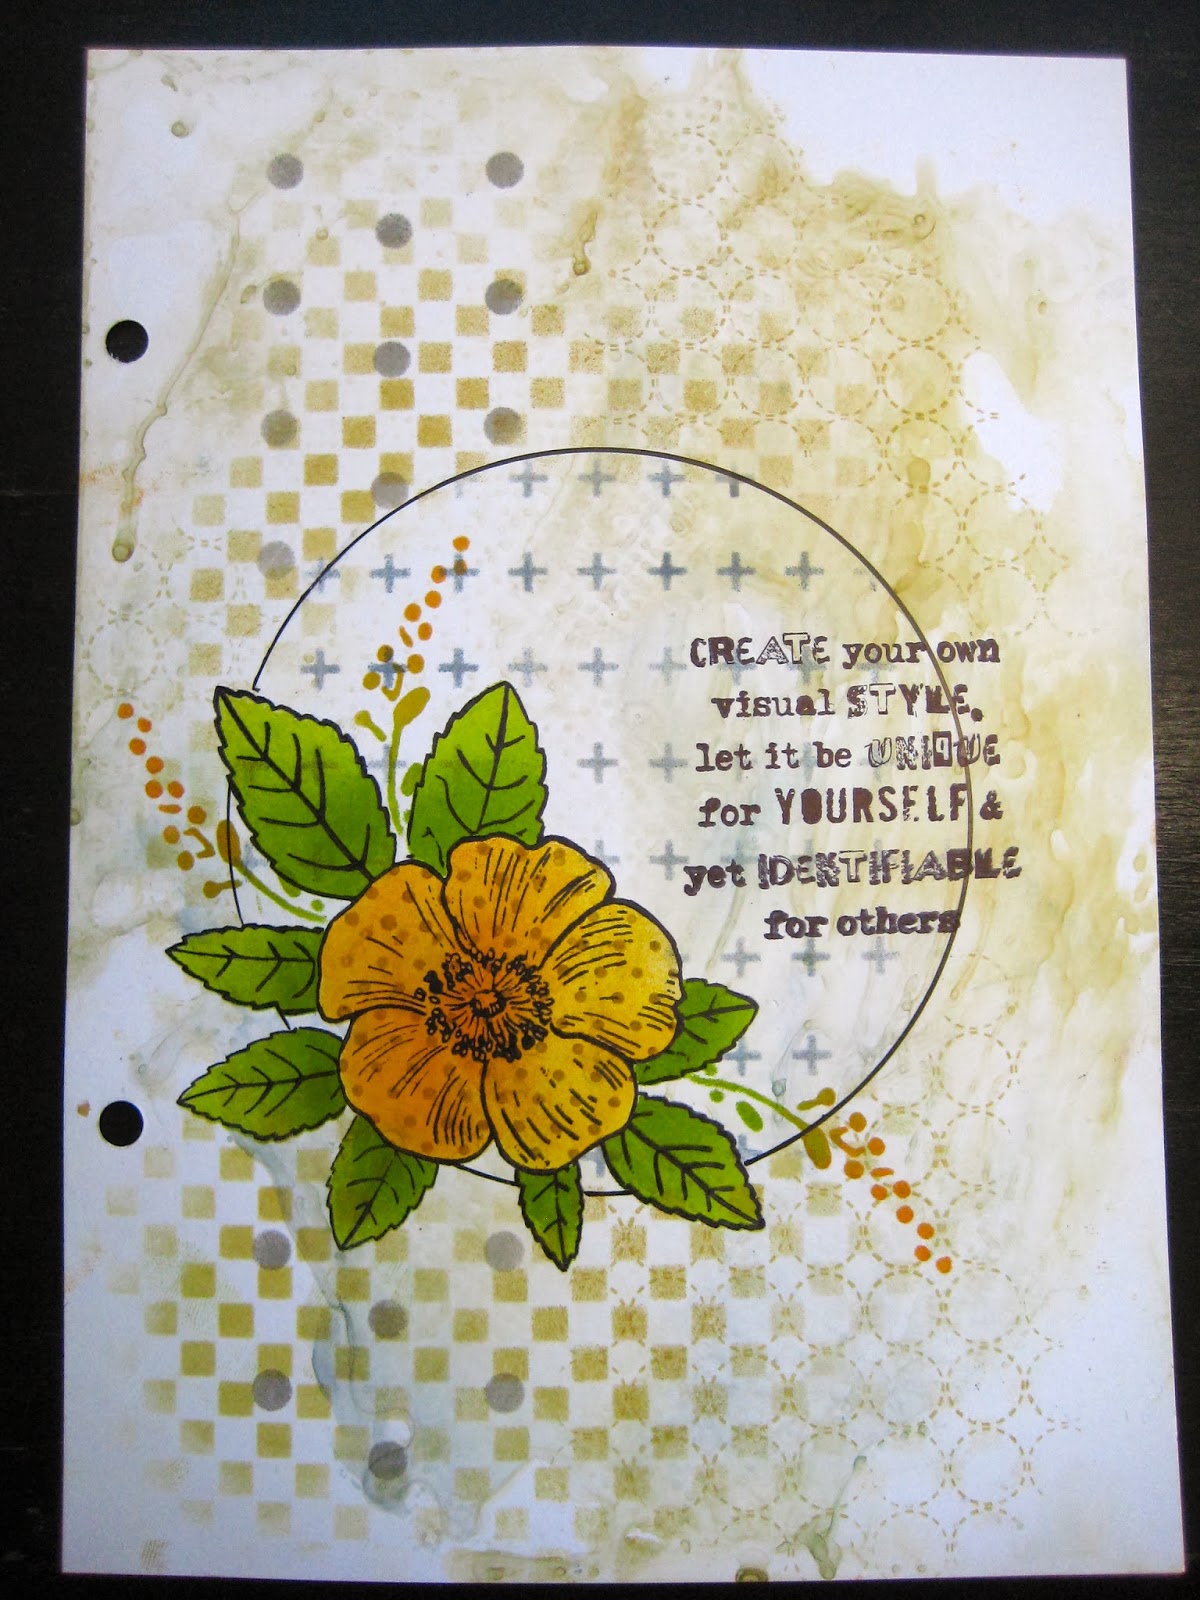
in my last post, I showed how to use the in full bloom SiSi (stamp it -stencil it) on a large art journal page…
for today's post, I wanted to show that SiSis are great for cards too…
with a SiSi, you can add lots of detail, but keep the card completely flat for mailing...
to start...
I cut a piece of SSP to about 5 x 3 ¾ inches…
then used jet black archival to stamp the perfect peony & embossed it with clear super fine detail embossing powder…
the stamp & coordinating stencil are in the same package, making all the SiSis a bargain at $9.95…
even the ones that have 2 stamps in the package...
thank you Mr. Stampers Anonymous...

you'll see that I stamped it to the far left side of the paper…
I had a little idea…for the finishing touch...
you'll see that later…it's important to emboss the stamped image…
if you are using this technique…
remember…
rubbing alcohol removes archival ink…
the embossing powder, which is basically ground up plastic, seals the archival ink & protects it from the alcohol…
here's the perfect peony stamped & clear heat embossed…
now its 'll ready to be painted with archival inks!

I swiped the corner of the leaf green archival pad onto the craft sheet…
and used the craft sheet as my ink palette…
it takes VERY LITTLE ink…much less than you think…
one little swipe is plenty...
I picked up the ink with the detail water brush (it's filled with alcohol) & painted the leaves…
& gave it a quick dry with the heat tool...

I swiped the waterbrush on the craft sheet to remove the green…
until it goes to clear...
then I swiped the forget-me-not ink pad on the craft sheet & painted the flower…
my first layer is uneven…
I did that to show you that the first layer really doesn't matter…
dry this layer…
so far it looks like this, with the first forget-me-not archival ink painted layer...

now I added another layer of forget-me-not to add shading & dried it…
then swiped the cornflower blue archival pad on the sheet & add more shading, always using the detail waterbrush…
remember to dry…
you can make the painted layers very even, but I like the uneven more watercolor effect…
***I like to keep a paper towel near by to blot the waterbrush if it gets too wet, especially when painting small areas***
keep in mind that even though the archival inks has been diluted with alcohol, they are still permanent & waterproof…
so that means that any water based product like Perfect Pearls mist, distress inks & plain water can be used over this image & they will not affect the image…
the image remains crisp & clear with no bleeding or smearing…
now it looks like this…

I placed the coordinating perfect peony stencil over the painted image…
so that I could add stamping…
I used watering can archival to add polka dots to the flower & tiny text to the leaves...…

I added a spotlight frame with a waterproof pen…
this time an oval…
and stamped the sentiment with jet black archival…

remember you can always "put a bird on it"…
I used orange blossom archival to stencil the bird…
masking tape can block off areas of the stencil to keep them protected…post-it notes are good too...
the new mini blending tool is THE BOMB!
you will LOVE it for stenciling!

I wanted to add a stamped pattern inside the stenciled bird, so I did a little surgery on my new large collage background stamp…
now I have 9 mini stamps, perfect for stamping over stencils with small openings, or for random background stamping on art journal pages…
you can easily change plain flower stencils NINE times!

stamping the mesh portion of the stamp on the bird adds more detail & more interest to the flat card…
I used watering can archival for stamping the mesh...

I used the stripes/polka dots border stencil…
I used the new dandelion archival for the stripes...
note to self…
clean stencils before taking photos…
yikes!

now the stripes appear to be under the oval…
see the shading under the flower & around the stem/leaves?
I swiped the iced spruce marker on the craft sheet, picked it up with the water filled detail waterbrush & added shading around the flower, stem & leaves...
I LOVE the iced spruce marker for creating shadows…
it looks great with any color combo & it's not too stark…
pumice stone is another good marker to have for shadows…
adding the shadow is a small detail, but it makes the flower stand out…and is very effective for flat cards or art journal pages...
make sure to add the marker from the craft sheet, not directly onto the paper...

I wanted to add some lines along the stripes to define them better…
and round the SSP corners...

now the finishing details…
I stamped the flower way over to the left so that I could do a little cut out deal around several petals…
after trimming around the petals, I chopped off a bit (¼ inch?) on the left side to allow the petals to hang off the SSP...
I added black glaze pen dots around the oval & a dot to create an eye for the bird…
then a tiny black string bow…
and mounted it on a black card...
I used tim's sizzix on the edge mini scallops die on the card bottom…
and rounded the top corners of the card to coordinate with the mini scallops…
I added foam under the SSP to raise it off the card base…
it's completely flat, except for the string bow...

are you shocked? NO BROWN was used…
what's happening to me?
YIKES!
actually, my plan was to use tree branch archival for the stripes, but I grabbed the wrong pad…duh…
I was having too much fun & not paying attention…
but I ended up being happy with dandelion stripes...
here's a better look at the watercolor effect of painting with the archival inks and the little cutout detail…
this also shows the shadow, created with the iced spruce distress marker...

using the SiSi allows stamping in several areas of the flower…
the card looks dimensional, but the SSP is completely flat…
using the SiSi stencil allows the stamped images to be stamped with any stamp you have…it can look different for every project…
use text, polka dots, mesh, mini numbers or any background pattern…
there are so many options...
and that's why I LOVE SiSi!
you aren't stuck with a stamp that always looks the same…
so…that's painting with archival inks!
plan A!
there's another way to paint with your archival inks…
that's plan B…
and a story for another day...
now it's time to celebrate!
once again…
A HUGE THANK YOU
to everyone who takes time to stop in
& leave a comment…
send me an email or ask a question...
I think it's amazing how art (an ink pad & rubber stamps) & the internet can change strangers into wonderful friends…
I'm going to divide the prizes between the blog &
giving you 2 places to drop your entry ticket…
which is a simple comment…
while you're visiting my Facebook page, I would appreciate it if you would click "LIKE"…that way my posts end up in your newsfeed…
and feel free to share the giveaway with your Facebook friends too...
somedays I pop in on my Facebook page to share a sneak peek…
or a little tip…
like this one that I posted yesterday…


a little Thursday tip…
use forget-me-not archival ink to stencil a butterfly onto a kraft scrap, stamp some dots with Ranger Inkjet black archival, dry, cover with my translucent embossing paste & allow to dry. cut out the dry butterfly & you have created a custom strong dimensional embellishment..just like the second photo...
try it! it's fun!
it's fun quick way to stay in touch...
I have some over the moon AWESOME prizes for YOU…
here's the list…
from Kim at eclecticPaperie…one of my favorite on line stores...
you can choose any 5 you'd like, even the new ones that
will ship in March…Kim will send them when they arrive.
if you choose some current stencils, they will ship now.
choose your prize & get exactly what you want!
THANKS KIM!
from tim…I'm sharing some stash that he sent me…some of my
most favorite of his idea-ology…YES! the NEW
share don't hoard them, you know I LOVE you!
THANKS TIM!
from Ted, aka Mr Stampers Anonymous…
wait 'til you see this…
6 brand new stamp sets
6 brand new stencils
6 brand new SiSIs…
THANKS TED!
from Ranger…2 complete sets of my 12 archival inks! YIPPEE!
they are even sending the 6 brand new colors!
I'll divide these up & add them to some stamp sets…
hey…GOTTA have inks to use with stamps!
and…a brand new Ranger apron to "make art" in style!
THANK YOU RANGER!
from Simon Says Stamp…a favorite on line store…
Heidi has a special CATEGORY of my products that
are featured at 40% off…just for this celebration…
the sale is good NOW thru FEB. 7th…
there are 348 products included!
it includes Blossom Bucket...
some art parts…
some background stamps…
some stamp sets...
THANKS HEIDI!
from my friends at onlinecardclasses…these gals do an
AWESOME job. I just recently participated in their
"STENCILED" class & it was GREAT…
I have 3…YES…3 seats to giveaway for their next class
that will start on March 3rd. The class title is
CLEAN & SIMPLE 3, one layer cards…
these classes have lifetime access & you can go to school
in your nightie! you can still join Stenciled, just
click the link above to see the class contents...
THANKS JENNIFER McGUIRE & friends!
from Rick…he wanted to get in on the action…he's sharing embossing
pastes, Blossom Bucket embellishments &
whatever else he finds in my stash!..hey…
that's what he said! sounds like he's planning to send out 2
GIANT boxes of supplies to MAKE ART!
what a guy! I bet he won't share HIS Budweiser!
PHEW…how's that for an awesome list of goodies?
for sure it's my biggest giveaway to date...
I think it's extra exciting because you have LOTS of chances to win!
the random winners will be chosen by Rick at 7am (Chicago time) on Monday Febuary 3rd…
to enter, leave a blog comment here...
and on my FACEBOOK page…
we'll choose winners from both places...
from the bottom of my heart…
a MILLION THANKS
for your support & friendship…
now it's time for me to…
make art!
wendy