here's how I got started...

here's how I got started...
a 20 minute podcast by Crazy BeYOUtiful

Thursday, March 28, 2013

with one stamp...and EXCITING NEWS!

I thought I'd show you some fun ways to use one of my most favorite background stamps...

it's in the heirloom art set...
from my newest release...

I stamped it with jet black archival on a #5 manila tag...

I used Ranger's Craft Rub-It Scrub-It under my tag...
to protect my craft sheet...
a cork mat would work too...

NEVER EVER use anything sharp on your craft sheet...

working from the tag front...

 I used a push pin to make a tiny hole in each of the pattern centers...

and why you ask...

didn't I use my Craft Pick???

because it is MIA...

keep in mind
 only 2 people live here...

so I'm on a mission to find it...
most likely "you know who" 
used it in the garage for something...

but I LOVE him & I'll forgive him because...


HE DOES WINDOWS!

anyway...
back to business...
here's the tag...


 I turned the tag over & 
placed it back on the Rub-It Scrub-It 
then used a larger push pin to make larger holes...
the tiny holes make it easy...

using a larger diameter push pin
 pushes the paper to the front of the tag...


now the tag front looks like this...


to ink the tag, 
I used salty ocean & mustard seed distress inks 
over the whole tag first...
then to accent the holes,
 I used gathered twigs on a blending tool ...
LIGHTLY over the raised holes...


you can see the dimension this creates here...


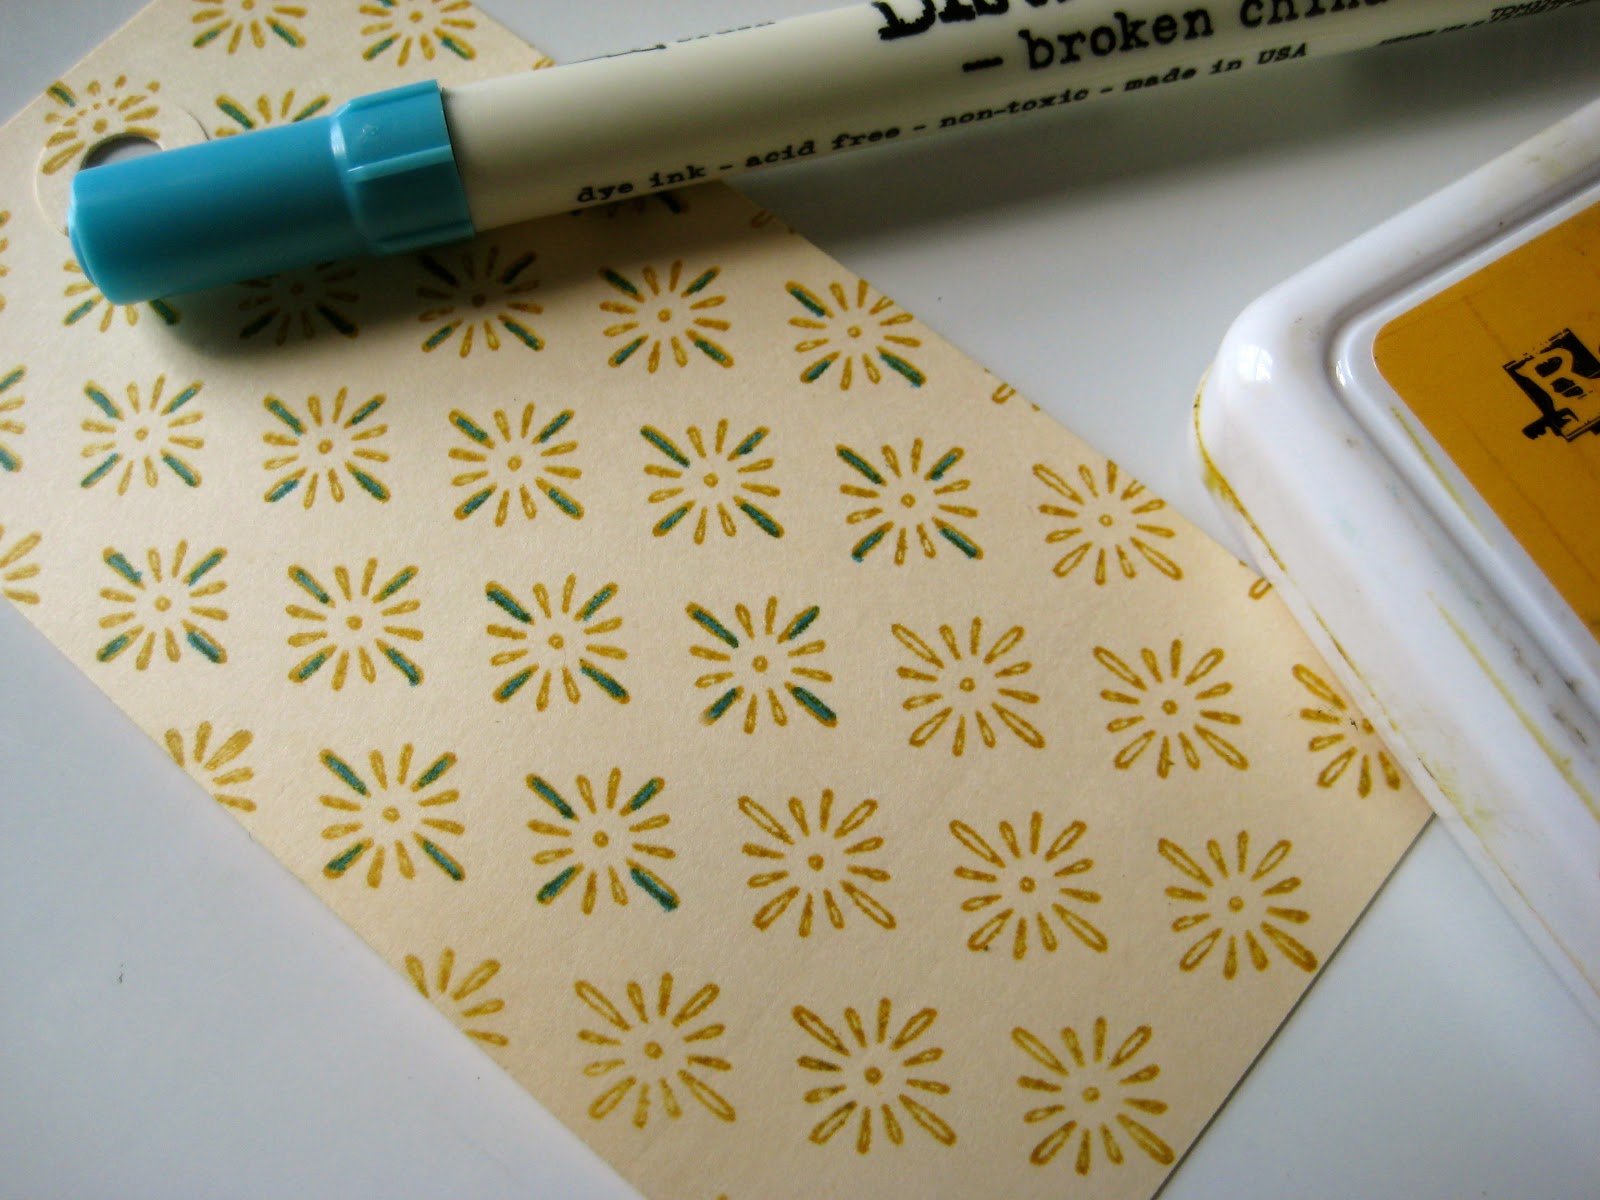
for the next sample, 
I inked my tag first with the same colors 
as the first tag...

then stamped my background, using jet black archival...

then I colored in 4 of the "stitches" with the stormy sky distress marker...

the fine tip fits perfectly in the design...

and changes the look of the stamp, by creating a different pattern...

see...?


for the next tag, 

the same colors as I used on the top 3 tags...

this is tim's wrinkle free distress technique, 
but done with the distress paints...

always shake the paints before using...
then apply some paints to the craft sheet,
 mist them with water & drag the tag thru the paint...
dry...the tag is now waterproof & will not react with water...

go back & pickup the remaining paint dots & dry...

you can see that the same distress colors 
create a really cool
 opaque WATERPROOF background...

you can fill in any unpainted areas with any color distress ink using your blending tool...


to create a more subtle background, 
to add an accent dot to the centers...

because I didn't use jet black for the background, 
I can use it for my main images & they will really pop...

LOVE it!


and for an even lighter background...

I used saffron archival on my stamp,
then colored in parts of the pattern with my 

I like this look too...

this again is a manila tag...
but no ink has been added...


 here are some finished samples...

the first one is stamped with french ultramarine archival...
again...to create a more subtle background...

then I added dots to the centers, 
this time using the Sakura Glaze Pen...

this allows my embossing paste

my crow & art parts word to be the focus...


here...
the background is bolder, because I used jet black again...


here's a sample with the holes...

it's stamped with saffron over specialty stamping paper...
and I used jet black for my main images...


and one REALLY COOL technique 
is to emboss the background...
since this is a fine lined image,
 I like to use 

I stamped in jet black & sprinkled the powder on while the archival was wet...

YES! 
you sure can emboss with archival inks!


here's a better look at the embossed background...
the fine detail powder is perfect!


and speaking of...

DISTRESS PAINTS...

this is exciting news...

YIPPEE!

just what I wanted  NEEDED...


these are the PERFECT addition to the distress paints...


check out the video on tim's blog...

oh the fun we'll have!

Happy Easter...
Happy Passover...

I don't want chocolate in my basket...

I'd much rather have these new distress paints to...

make art!
wendy


Friday, March 22, 2013

sharing a tutorial...


happy FRIDAY!

I like products that are versatile...
and
I LOVE it when they can be used several different ways...

 stencils can be used with my embossing pastes...
to create really cool texture & dimension...


you can trace the stencil with a waterproof pen,
 then add color 


you can ink thru the stencils with distress inks...
using a blending tool...
and then stamp thru the stencil, for a cool result...


I thought I'd share a tutorial today,
that I did for the Ranger blog...

this is another way to use the same stencil...
and a twist on using tim's distress embossing powders...


the dabber is GREAT thru stencils!

here's a peek...


you'll find the finished tag on Ranger's blog...

here...

and you'll find the list of ingredients and the 
"how to" steps on 
the project page on Ranger's site...


I hope you have an inky weekend...
make a tag!


if you need a little inspiration...
take a sip...


then...

make art!
wendy

ps...I still haven't heard from
 LARISSA HASKETT...
the winner of tim's tattered florals die...
email me please...


Monday, March 18, 2013

more Clearly for Art info & a winner...

thanks so very much 
for all the sweet comments 
about the last post...
I sincerely appreciate them!

here's a little more Clearly for Art scoop...

steel ruled dies cut the CFA easily...
so that means the big fat Sizzix dies...

the thin dies do not...

I've not found any punches that are strong enough to cut thru the material...

I've broken several punches...
DO NOT TRY THIS AT HOME!
lol...

it cuts easily with scissors...

a gal asked about embossing the CFA...

remember in the last post I said that every time you heat the material it goes completely flat...
so, you would loose the embossed pattern...

HOWEVER...

 emboss it, 
then heat it...

the strong adhesive on the metal foil tape will hold the embossing...
even when you heat it to shape it!

it's pure & simple...
magic!

so the flower below is metal foil tape, 
OVER the CFA...

I stamped my flower stamps on the CFA side (the back) 
and cut this out with tim's tonic scissors...
simple...


one thing to keep in mind...

heated metal gets HOT...
so use caution...

and a little tip...

***remove the backing paper from the metal foil tape in small sections, when applying it to the CFA...***
or any other surface...
***don't take off the whole sheet of backing paper at once***

that adhesive is really strong...

TRUST ME!


how would you stamp on the Clearly for Art whiteout?

with Ranger's jet black archival...
just remember to dry it...

I used it below on the whiteout...
with my plaid background and the polka dots...

the largest layer is the largest tattered florals flower...
the 2 smaller are the same as the flower above...


and what inks would show up on the Clearly for Art blackout?

I like to use the metallic dabbers...
LOVE the gold & silver the best...

so I stamped the flower below with the gold dabber, 
onto the blackout...
***just remember to 
clean your stamp before the paint dries***...

cut out the flower...
heat to shape & you end up with this cute black flower...


my next experiment (when I have a few minutes to spare)
is to use the new distress paints for stamping on the CFA...

I have a ***feeling*** this is going to be fun...
with a whole different effect...
I'll be trying them on all 3 flavors of the CFA...


CONGRATS to the winner 
of tim's tattered floral die...

it's going to...

Blogger Larissa Heskett said...

Fantastic,
just the inspiration I needed for today. Thanks for showing us what you did and for the chance to win!! Have a Fabulous weekend!! =)
March 15, 2013 at 8:00 PM
 

and SURPRISE...

I thought it was so cool that many people left a comment, 
telling me they already had the die...

so...

I'll be sending 2 random people a copy of my book #7...

CONGRATS to...
Blogger Beejay said...
Thanks so much Wendy for all the great techniques. I enjoyed watching a great demo of yours at CHA. Love your stamps!
March 16, 2013 at 11:50 AM
 Delete


and to...


Blogger SusanK said...

Love your use of the Tattered Florals die cuts with CFA! That stuff is simply amazing!!!!!
March 15, 2013 at 12:41 PM
 Delete

please email me with your shipping info & we'll get these 
postal!

wbv1213@me.com

here's a little conversation from our breakfast this morning...

Rick...remember, we have to leave tomorrow. The guys will 
be here @ 7am to install a new furnace & AC...
we won't have heat for 6 to 7 hours...

Me...what color is it?
I sure hope it's cute...

Rick...major eye roll...it's a bloody FURNACE...

somedays he thinks I'm nuts! oh well...

gotta run...

I leave you with this thought...

and another example of the tattered florals die 

used again 

with the Clearly for Art...


ALWAYS...
be yourself and...

make art!
wendy


Friday, March 15, 2013

tattered floral fun & GIVEAWAY...

today I have a tutorial with some fun tips...

my main ingredient for this piece was created 
with tim's tattered florals die...

you know I LOVE flowers & 
this die has 4 AWESOME different sized flowers...
totally...LOVE IT!

here's what  I created...


if you want to play along...


start by covering a sheet of Clearly For Art 
(the clear variety...)
with a thin layer of Ranger's Glue N Seal & set aside to dry...

***the Glue N Seal adds tooth to the CFA, 
so it can be painted with rock candy crackle paint***...

after the Glue N Seal is dry, add a fairly thick layer 
apply it thick in some areas & thinner in others...

set this aside to dry & crackle...

you will end up with a sheet of CFA that looks like this...


when the crackle paint is dry, 
use tim's tattered florals die with your Vagabond 
or die cutting machine,
 to cut 2 of the largest flowers...

then add broken china distress paint over them...

I like to tap the paint on with my finger...
allow to dry...


use jet black archival to stamp over both flowers 
with any background stamp...
and dry...

I used this background stamp...


 add shading with brushed corduroy distress ink, using the blending tool...
& dry...


use the gold paint dabber to add paint to the flower edges & dry...

can you see how each step/layer makes the flower more interesting?

now it's cute!


next, cut one of the medium size 6 petal flowers from the CFA...

follow the steps above to color this flower, 
then use jet black with this mini squares background 
to stamp over the flower & dry...

the flower now looks like this...


use the tattered florals die again to cut 3 of the smallest flowers from the remaining CFA...

***this is a good way to use up scraps 
& have mini flowers ready for future projects***

use mustard seed distress paint to color the flowers, 
 dry, then use jet black archival 
 to stamp over all 3 flowers...
dry...

accent the flower centers with 
my Blossom Bucket black berry centers...
here's the silver...but I used the black...


cut 2 sprigs from the CFA, using tim's tattered pinecone die...

paint over the sprigs with peeled paint distress paint
dry, then use the gold dabber 
to highlight the sprig edges & dry...


paint over the word band with broken china distress paint, 
then lightly wipe away the excess paint, 
leaving the paint only over the words...

 add gold to the edges with the gold paint dabber...


oops...forgot a photo of this next part...
I was having too much fun & lost my mind...

then stamp over the scallop using the gold dabber on the polka dot border stamp...

***when using paint on your stamps, 
clean them before the paint dries!***

use jet black archival 
to stamp the flourishes 3 times over the burlap panel...

***because the burlap panel has a solid base,
 this makes stamping very easy***

***when stamping on fabric, make sure to have a well inked pad & to keep the stamp in place for a few extra seconds.
 this allows the ink to penetrate the fabric, for a better image***

add some walnut stain distress ink to the panel edges, using the blending tool,
then use the gold paint dabber around the panel edges,
 to create a frame effect...

heat the CFA flowers one at a time to soften the CFA material...
while the CFA is soft, shape to make dimensional...

***CFA goes back to flat each time it is reheated. 
so...
if you don't like the shape,
 just place it back on your craft sheet, 
blast it with the heat tool & 
reshape until it's perfect!***

assemble the flower as shown below & add 2 Blossom Bucket embellishments to the center...

I used this and another on top...


***here's a cool tip***
 on how you can add tim's clock key
when it's not feasible to use the screw...

determine the center of the panel top, 
then use an awl to start a hole...

add a nail that will fit inside the clock key...
pound it into the wood on the panel so it's sturdy...

***save the clock key screw for another project***


cut off the excess nail, 
so that the clock key fits against the panel...

add multi medium to the nail & inside the clock key 
slip the clock key over the nail
& allow to dry...

the multi medium holds it securely...
no screw needed...


to accent the lenses of my Blossom Bucket camera...
add 2 of the smallest epoxy dots from tim's custom fasteners...

magically, they are a perfect fit...

***for plan B...
use Glossy Accents***


next, heat the sprigs to soften & shape them...

add them under the large flower, then add the 3 smaller flowers, the word band & the camera...

add a hanger to the top back & it's ready to hang...

see the art arts scallop on the bottom of the panel...
it's peeking out...

oops...
forgot to say that I glued that on...

I also added a few clear blue accent gems..
not sure where those guys came from...


 tim has given me a tattered florals die to giveaway...
YIPPEE!

just leave a comment & that's your entry ticket...
super simple...

we'll draw a random winner at 7am Monday morning...
make that Chicago time...

then send the die off to the lucky winner...

I hope that you've enjoyed this tutorial & 
that you just might be inspired to...

make art!
wendy
ps..THANKS TIM!
that was fun!