here's how I got started...

here's how I got started...
a 20 minute podcast by Crazy BeYOUtiful

Friday, August 17, 2012

distressed, dimensional stencil art...

I've got a cool technique tutorial to share...

today, I'll show you how to create this
distressed, dimensional stencil art tag, 
using my new 
studio 490 stencils for art...
distress inks, distress stains & distress markers...
a little archival ink
and of course some studio 490 stamps...


just a reminder...

always work on your non stick craft sheet
to protect your work surface...

ink a small #5 kraft tag with broken china & brushed corduroy distress inks...
apply these with the blending tool...
then add some shading to the tag edges, using walnut stain on the blending tool...
your tag will look like this...


lay the polka dot/striped stencil over the tag as shown, then lightly mist with water...
allow the water to sit on the tag for a few seconds...

remove the stencil...
STENCILS DO NOT LIKE THE HEAT TOOL!

then dry...


the water will lighten the ink & create a subtle polka dot pattern...
your tag will now look like this...

choose your favorite flower from the
3 fresh flowers stencil & place it over the tag...
use post-it notes to block off the area around the flower...
this will protect those areas from the next step & the post-its also hold the stencil in place over the tag...


using a palette knife with embossing paste...
it's the secret ingredient...


spread the embossing paste over the stencil...
use the palette knife to scrape away the excess paste
(put it back in the jar)
the paste should be as thick as the stencil...
for this sample, I kept the texture smooth...


lift & remove the stencil...

***clean your stencil & palette knife with water***
DO NOT let the paste dry on the stencil or palette knife...

 dry the paste with your heat-it tool...
I dry it from the top & from the bottom...
this helps prevent warping of the tag...
from the moisture in the paste 
sitting on the tag too long...


if you just let it sit & dry...
it takes about 45 minutes (depending on the humidity in your area)
& the warping under the paste is much more significant...

 your tag will look like this...


when the paste is dry, use the peeled paint distress marker to ink the stem & leaves...
use the tumbled glass marker to ink the flower petals...
use the wild honey marker to ink the flower center...
it will look like this...


working from the flower center out...
use the broken china marker to add shading to the petals...
color right on the petals, then
use your finger to spread the ink outward from the center...
now your flower looks like this...
with very cool shading...


next, use the faded jeans marker to ink the petals...
staying closer to the center of the flower...
spread the ink with your finger...

your flower should now look like this...
with another layer of shading...


and your blending finger will now look like this!
oopsie!
better get used to it 
if you're going to hang out here!


 place the stencil back over the flower &
 mask off the surrounding area with post-its again...
using jet black archival, stamp any background stamp over the flower...
I used my polka dots...
but any small patterned background would be fine...
I like this text...
the stencil/post-its protect the background from the stamp...
the background remains clean & unstamped...

REMOVE the stencil...
stencils will distort & melt if heated!
you won't be happy...
trust me!

dry the ink with a heat-it tool...
AFTER you have removed the stencil...


using a waterproof pen...doodle around the petals...
the stem & leaves...
make it irregular & artsy!
it should look like this...


trace around the petals with the old paper marker...
this adds shading under the petals...
then use the pumice stone marker to add darker shading around  the flower center...
it will look like this...
it's kind of stark...
but the next step will fix that!


lightly mist the flower with water, 
to blend the flower colors & the shading under the petals & dry...
keep in mind that if you use too much water, it will lighten the distress inks on the petals...
remember...
distress inks always react with water!
BUT, if that happens...
just go over the petals again with the markers...
it's an easy fix!

for more controlled blending...
use the detail water brush to blend the colors...
instead of the mister...


after misting...
you'll see the blending & softening of the colors around the petals...

use jet black archival to add some stamping...
I used my new numbers stamp & the word ART...

to add more water spots,
mist a bit of water into your hands & drip onto the tag...
let sit a few seconds, then dry, to add more texture/depth to the background...

it now looks like this...


shake the tarnished brass distress metallic stain to mix it completely...
with a barely moist dabber top, 
randomly ink over portions of the stamp...
do not cover the whole stamp...
(this is an excellent stamp for random stamping & art journals...
the text is really tiny & it can easily be combined with other backgrounds)


press the unmounted, randomly inked stamp
 over a few areas of the tag & dry...
the tag now looks like this...


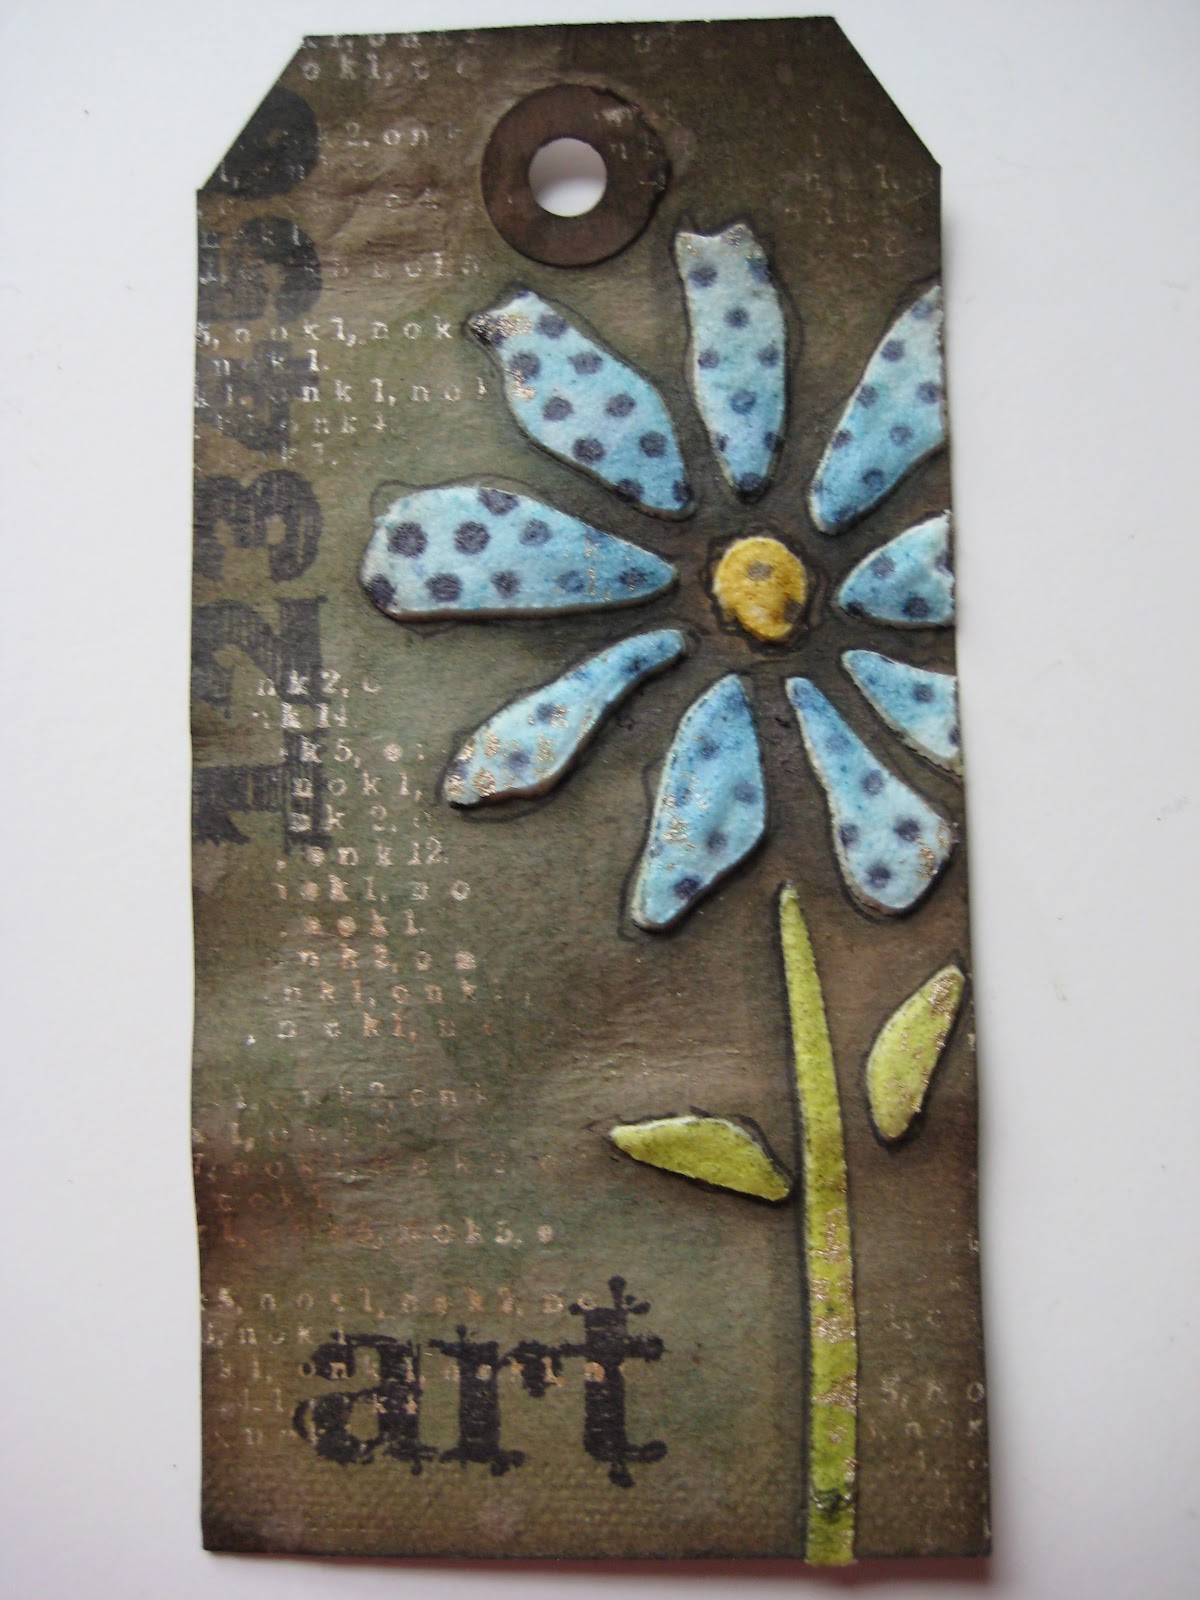
for the finishing touches, add some doodling around the perimeter of the tag...
add more walnut stain shading to the edges if needed...
add some glaze pen dots to accent the flower center...
I added a tiny bit of brushed corduroy (on the blending tool) over the flower to tone it down a bit...
use the tarnished brass stain to edge the tag...
it's a great finishing touch...
with the barely moist dabber top...
just run it along the tag edges...

and when in doubt...
put a bird on it!

that little blackbird is a new piece from Blossom Bucket!
he's arriving next month!


I LOVE this look...
it's very dimensional...
very vintage...
very lightweight...
and very easy to create!

PLUS...
there are LOTS of options...

look closely...
below is the same stencil...
same technique,
same distress marker colors...
 but done on a lighter background...
and the background is created with the distress stains...

I'm finding the stencils to be very versatile...


here's another variation...
this is the original test drive tag I made...

instead of smoothing the embossing paste, I tapped the palette knife over the wet paste to create peaks...
these petals have a REALLY lumpy texture...


same stencil again...
no embossing paste this time...
just trace around the stencil to create the basic shape...
doodle a bit...
ink with the distress markers...
for a quick journal page...


do you see the possibilities?
what are YOU thinking?
got some fun ideas?

shoppers alert!
if you don't have the distress markers...
they are ON SALE for 20% off 
with this code at checkout...

 BSPM 
it's good today FRIDAY & SATURDAY only!
clicking on any link will take you to the product I used...

this post is getting really LONG...
so I'll save the other options for another post...

just wait to see what I did with 
it was so FUN!
and TOTALLY different 
than the samples I showed today...

 it's coming soon...
 to a blog near you!

one more thing before I go...
I didn't hear from the winner...
so I have a prize package for...


Blogger Helen said...
Loving all the art - and well done Susan! My list of must haves is growing every time you share more art!
August 15, 2012 10:15 AM
 Delete


please send me your shipping info...
wbv1213@me.com


CONGRATS if you've read the whole post!

some lucky commenter may win a prize...
just sayin!
I still have new stamps & art parts ready to ship...

I hope I've sparked your imagination just a bit & that you'll be inspired to...

make (stencil) art!
wendy
ps...have a wonderful weekend...
GO BEARS!
 I always have high hopes...
sad but true...


74 comments:

Mieke said...

Thanks so much for this tutorial..LOVE the work you did!!!!
Have a great weekend to!!

Cheri Reed said...

Love that flower. Thanks for the great tutorial. It's raining here...yay! I'm off to play with my stencils and markers!

Elaine A said...

Wendy -

These are just wonderful! I can't wait to get my hands on the stencils. I love the 3-D effect they give with this technique. I think I may have some modeling paste in a jar somewhere - LOL! Now I just need the stencils.

Elaine Allen

P.S. Keeping Rick's brother in my prayers.

Unknown said...

I must have that flower stencil! Love your results.

Gabrielle said...

Truly, truly inspiring ideas! I love the whole idea of that embossing paste... I wonder if it's here in the UK? Off to investigate... I must momentarily stop to congratulation the really lovely Helen for her win - you have no idea how you have just made her week - good things really do happen to wonderful people! Thank you Wendy x

Helen said...

Thank you Wendy so much - as Gabrielle says, you HAVE made my week as I am in all probability about to lose my job.... AND today's art is just stupendous.
Will email you - doing a happy dance! Thank you.

Anonymous said...

I LOVE your tutorial. I can't wait to try this technique! Your tag came out gorgeous!
Kate

Ruby Craft said...

I love your tags and your tutorial! So many different looks from the same stencil! Thanks for the heads up on No Heat for the Stencil!

Hetty said...

This looks so easy to do with the right stencil and stamps. Thanks for the tutorial. Now I have to go shopping........

jill said...

I am loving your stained,stamped & stenciled art! Gotta get me some Wendy stencils for sure!!!!!

Jess B. said...

OMG love this tutorials. A must on my to do list. TFS

Craft Addicts - Tracy Evans said...

I love this technique Wendy. I often use texture paste to do this so it's great to know that embossing paste works in the same way. Love the colouring with Distress Markers, your flower looks stunning as does the background. Thanks for sharing. Tracy x

Unknown said...

I have this paste! Forgot all about it! Gotta pull it out and play! WooHoo!

Primitive Seasons said...

I love what you did with the palette knife to create texture on the paste petals. Love it! Great stuff Wendy girl.

Mary

Kay S said...

Thanks for the great ideas. Need to find time to play and try them out.

Dorothy said...

Very cool! I love embossing paste!!

SusanK said...

Very, very cool tech tut! I've already applied stencil paste to my newly won stencil - you'll never look at stencils the same way again!

Linda R said...

I really enjoyed all the ideas in this post! Colors are fab too.

Anita Houston The Artful Maven said...

Da bears!!!
Gorgeous Wendy! I love all the variations you did! I so need those stencils and embossing paste!!!

Unknown said...

Hi Wendy. Just when I think I've decided on which stencil/stamp to buy you show me another technique with a different gorgeous stencil (this stencil or the rose stamp ummmmm guess I'll have to rob a bank and buy them all) again this tutorial is great it looks fun and messy to do as all great art should be. I love the finger tips that's when you know you've been truely creative,

ellen vargo designs said...

Awesome post, Miss Wendy! Love it! I don't have the embossing paste, but I imagine there are many other options that would produce the same result... textured stuff through stencils is awesome! Love the distress marker blending and the metallic stain stamping (I sense trouble in my future...). have a great weekend! Ellen x

Stampnms said...

You have inspired me. I'm going to break out the embossing paste & some of my old brass stencils & try your technique.

Kathy Eddy said...

I am in love with this tag! I NEED the stencils now! Is there anywhere that has them already or are we still waiting for them to hit the shops? Such possibilities!

Renee said...

Wendy - you've inspired me to get those stencils and some paste and go create! Loving the technique :) Thanks.

Anonymous said...

Love it! I'm so glad you've designed stencils!

Suzan VonEssen said...

OOh ooh thanks for the tutorial - I cannot wait to get some paste and some stencils to try this! I am loving branching out into the wonderful world of mixed media - thanks for your wonderful products and tips!! xoxoxo

Bunnyfreak said...

love these. thanks for the warnings with stencils and the heat gun.

Diane Swanson said...

I love this tag and the flower and the dots!!! SO glad you showed how to make it! Had no idea you used embossing paste and one of my friends just gave me two jars she didn't want! That look is just so awesome! I hope to see you at a show or in a class soon!
Diane

Disco Queen said...

Hi Wendy, Thanks for the tutorial. I have learnt loads inc. to place the mask back over before stamping over the paste.

Flo said...

A store I shop at has the Dreamweavers paste and I always stop and look at it. I never buy it because I didn't know what I would do with it. Thanks to you now I have to have it. Great tutorial.

PiHi said...

I need to get that embossing paste.. Just have to :) Beautiful work! Love it!

Redanne said...

Hi Wendy, I was wondering what to do with that embossing paste cluttering up my cupboard - rescued! Off to try this technique. Love your tutorial and congrats now to Helen! A x

Marijane said...

These projects are just amazing! I am so glad that you told us how to get the textured flower. I have a number of Dreamweaver Embossing Pastes that I had not thought to try with the vinyl stencils like yours. All three of your examples turned out so cute I can't wait to try the technique.

snazzyoriginal said...

Just love what you are making with the new stencils, can't wait to get them here in the UK xx

KGumkowski said...

Great Tutorial, Thanks Wendy. I will have to start experimenting with stencils again.

Jean said...

Thanks for the great stenciling tips, lots of good ideas, esp. no heat on the stencil...

borcherding said...

Freakin' AWESOME!! and my favorite tip is using the inks and putting a stencil over top and spritz with water for a faded effect. BRILLIANT!! Oh, and that flower ROCKS too!! :)

Heidi said...

I'm so excited!! I actually have the embossing paste!!! (now to find it and make sure it's still useable...just sayin...) from years gone by using it with the brass stencils.

The art as always is awesome!

Now off to search...

Julie S said...

Thank you, thank you for showing your process for this tag. My eyeballs were glued to the screen in your previous post. Stunning goodness. I've got some of that embossing paste sitting in my drawer that I bought ages ago - totally forgot about it. Time to crack that bad boy open.

Anonymous said...

Fabulous technique with the embossing paste! Will definitely have to get me some ! Sue C x

Lori said...

Aha! Embossing paste! I wondered what you used! LOVE the look, it's a way cool tag! That bird is so cute!
I'm lovin' the metallic stains!

Unknown said...

Wendy, this is awesome! Thanks for sharing.

whyducks said...

Wow thank you so much for sharing how you did this, I do hope I can get this stencil in the UK, so I can give it a go. Really lovely.

Tona said...

Thanks so much for the great tutorial. I love what you did with the tag...of course I always love everything you do :)

Erin Glee said...

Congrats to Helen on the win that made her week...hearing that made MY week! (Sorry to hear about you becoming unemployed, though).

Wendy! Great tutorial~ thank you for all your inspiration! I have some old powdered dimentional paste that I almost forgot about...you add water to make the consistency you want...it needs to get out of the box and MAKE ART today!

finnella03 said...

Wow how gorgeous. Have a lovely weekend everyone!

Cheryl said...

Wendy, awesome tutorial- thank you so much.

Tracey-B said...

Great tutorial, I really love this look! I need to try it out, thanks!

Wilma said...

Wow, awesome Wendy!! Love the embossing paste and what you create with it. Thank you so much for sharing and the inspiration.
Have a great weekend!!!

Athanasia said...

Great tutorial. The tag is so beautiful!

Karen Goulet said...

I love distress inks so much! It is great to see all the variations of the same flower. As always Wendy...You rock! Karen :)

Diane said...

I've been stocking up on stencils, but have yet to use them...you hav einspired me to get busy...and a great price for the distress markers, I have those too, but have yet to really use them...what is wrong with me...must be a no time thing...lol...but you are making me want to get busy...awesome tags!!

Debby said...

Thank you for the tutorial! I want these new products!!! Hope they will be there in Bloomington when you teach. This looks like so much fun.

Wendance Designs said...

Thanks so much for the awesome tutorial!!! Can't wait to try it!

Swedie said...

I really like the colors that result from your combining them, along with the other things you use.

Noreen
http://craftyjournal.com

marci said...

Already have the embossing paste, but never thought to use it on tags. Great idea - thanks for sharing.

Unknown said...

Very nice! I'm going to need those stencils since I already own the entire set of markers;)

michelle said...

Love what you did with the stencils and i really can not wait to see what you did with with heart. Man my shopping list is getting long but I am always so thankful that you share your talent with us because it makes me want to try new things and get my fingers inky!

Eyeleeeen said...

Great tutorial! You really show the versatility (and necessity of owning) of stencils. I've never used embossing paste, but have gotten great results getting different kinds of textures with modeling paste, fiber paste, thick gesso, and even plain old joint compound from the hardware store! I also love the idea of spraying water through the stencil. Gonna try that this weekend for sure.

betjunroe said...

I love the look of your new stencils Wendy! I just started using the paste in my artwork and really like how easy it is to use and color. Thanks for your awesome tutorials. Bette

Myrto said...

Thanks again for the inspiration! Thiw technique rocks!

Art By Wanda said...

Thanks for the step-outs, Wendy!!!! Loved seeing the whole process!! Can't wait for my stencil!!!!

redmom said...

This technique is so cool! I just picked up some of that paste, can't wait to use it with my distress markers! Thank you for all your constant inspiration Wendy!

Dawn B. said...

Love working with embossing paste, and this just goes to show how versatile your products are! Love it!!!! :-)

PlumTuckered's Paper Plays said...

Thank you for the Tutorial, I can't wait to try this out!! I had no idea we could use our Distress Markes on embossing paste...I know what I'm going to be doing tomorrow :-)

Cheryl said...

Great tutorial! Loving all the different looks the same stencils and products can give. Thanks for sharing!

Dawn B. said...

Love the tutorial! And.... I must have those stencils-all of them!! :-) I love the way all the studio 490 products are so versatile and mesh so well with Tim's. Course, all the new Ranger stuff is awesome too! Btw, you have me hooked on embossing again! :-)

Carol McCready said...

Love the tutorial. I can't wait to try out that embossing paste with the
stencils.

Meme said...

I have to get some of that stuff! Love those flowers!

You rock them!

BethW said...

i'd ever even herd of embossing paste-this technique is way cool.Definitely going to give it a try.

ScrapBazaar said...

Your tutorial is so detailed I'm nearly sure I will do a beautiful tag because of you. Thanks also to make me discover the embossing paste. I have to try This for sure.
I'm a french speaker sorry for my english :-)

ScrapBazaar said...

Your tutorial is so detailed I'm nearly sure I will do a beautiful tag because of you. Thanks also to make me discover the embossing paste. I have to try This for sure.
I'm a french speaker sorry for my english :-)

ScrapBazaar said...

Your tutorial is so detailed I'm nearly sure I will do a beautiful tag because of you. Thanks also to make me discover the embossing paste. I have to try This for sure.
I'm a french speaker sorry for my english :-)

Stacie (craft-princess) said...

WOW! Great tutorial! Thanks!